Foods to be canned may be packed in jars as raw food or hot food.
Raw Pack: Raw packing is the practice of filling jars tightly with freshly prepared, but unheated food. Such foods, especially fruit, will float in the jars. The entrapped air in and around the food may cause discoloration within two to three months of storage. Raw packing is more suitable for vegetables processed in a pressure canner.
Hot Pack: Hot packing is the practice of heating freshly prepared food to boiling, simmering it 2 to 5 minutes, and promptly filling jars loosely with the boiled food. This practice helps remove air from food tissues, shrinks food, helps keep the food from floating in the jars, increases vacuum in sealed jars, and improves shelf life. Preshrinking food permits filling more food into each jar. Hot packing is the preferred method for foods processed in a boiling water canner. At first, the color of hot packed foods may appear no better than that of raw packed foods, but within a short storage period, both color and flavor of hot packed foods will be superior.
Whether food has been hot packed or raw packed, the juice, syrup, or water to be added to the foods should be heated to boiling before adding it to the jars.
Headspace
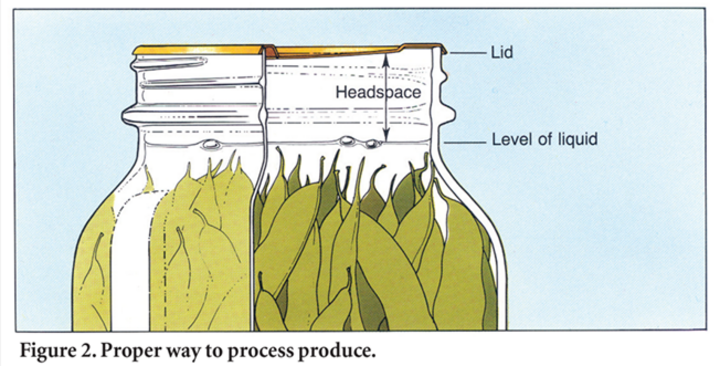
The unfilled space above the food in a jar and below the lid is termed headspace. This space is needed for expansion of food as jars are processed, and for forming a vacuum in cooled jars. The extent of expansion is determined by the air content in the food and by the processing temperature. Air will expand more than food will when heated to high temperatures. The higher the temperature, the greater the expansion. Pressure canned foods require a larger headspace than foods heated in a boiling water canner, because pressure canned foods are heated to a higher temperature.
For correct headspace for the food you are processing, use an up to date, research tested recipe or check Nebraska Extension food website. Fill jars with food and add liquid to cover food, leaving appropriate headspace. Release air bubbles by inserting a flat plastic (not metal) spatula between the food and the jar. Slowly turn the jar and move the spatula up and down to allow air bubbles to escape. Add additional liquid, if needed, to obtain the proper headspace. Clean the jar rim with a dampened paper towel. Place the lid, gasket down, onto the cleaned jar rim and fit the metal screw band over the flat lid. Uncleaned jar rim may cause seal failures. Follow the manufacturer's guidelines for tightening the jar lids properly. Overtightened lids may buckle or cause the lid not to seal properly. Process as directed in an up to date, research tested recipe for your specific food or check the Nebraska Extension food website.

After Processing
Do NOT retighten lid ring bands or push down on the center of the flat metal lid after processing jars. As jars cool, the contents contract, pulling the self-sealing lid firmly against the jar to form a high vacuum seal. Cool the jars at room temperature for 12 to 24 hours. Jars may be cooled on racks or towels. The food level and liquid volume of raw packed jars will be noticeably lower after cooling. Air is exhausted during processing and food shrinks. If a jar loses excessive liquid during processing, do not open it to add more liquid. After jars have cooled, check for sealed lids by following one of these three methods:
- Press the middle of the lid with a finger or thumb. If the lid springs up when you release your finger, the lid is not sealed.
- Tap the lid with the bottom of a teaspoon. If it makes a dull sound, the lid is not sealed. If food is in contact with the underside of the lid, it will also cause a dull sound. If the jar is sealed correctly, it will make a ringing, high pitched sound.
- Hold the jar at eye level and look across the lid. The lid should be concave (curved slightly down in the center). If the center of the lid is either flat or bulging, it may not be sealed.
Screw bands should be removed after jars are cooled. Wash, dry, and store screw bands for future use. If left on stored jars, screw bands may become difficult to remove, often rust, and may not be reusable. Before storing jars, wipe them with a clean, damp cloth. To remove mineral deposits, use a cloth that has been dipped in a solution containing 1 cup vinegar per gallon of water.
Sources:
National Center for Home Food Preservation, University of Georgia Extension
USDA Complete Guide to Home Canning, National Center for Home Preservation
Publication originally written by Julie Albrecht. Updated and reviewed by Carol Larvick in 2021.
Tags:


